
Are you looking for a step-by-step guide on how to make a banner in Minecraft? If so, you’ve come to the right place! This blog post will show you everything you need to know in order to make a banner in Minecraft.
How To Make A Banner Video Tutorial
You’ll learn how to construct a banner in Minecraft in this video tutorial. We’ll lead you through a step-by-step process so you can quickly and simply create your own banners.
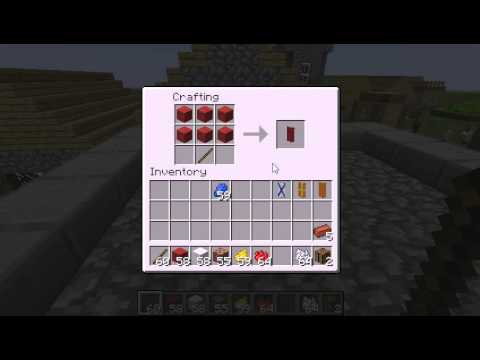
Gather the following resources first: Dyes, a thin cotton cloth batting, and a shield. Then, put the Shield in the crafting table and choose a banner design. After you’ve decided on a design, fill in each of the squares with the dyes.
After that, launch Minecraft’s Banner Editor, which enables users to customize their banner patterns. Finally, after you’ve completed your banner, put it on a wall or fence and you’re done. You now have your own distinct banner. This video lesson is an amazing method to get started fast and simply producing banners at home.
Available Platforms
Making a Minecraft banner is a terrific way to add color, flare, and individuality to your world. For creating a banner in Minecraft, you may use the Java Edition, Bedrock Edition, Xbox One, PlayStation 4, Nintendo Switch, and mobile platforms Android/iOS. Each platform has its own set of tools and mechanisms for creating your banner.
To make banners in Minecraft Java Edition, you’ll need dye supplies. These colours may be obtained by smelting certain plants or killing specific enemies. The Bedrock Edition enables you to decorate with banners with various designs or shields that give additional armor protection while carried in hand. Players on consoles such as the Xbox One, PlayStation 4, and Nintendo Switch may also make banners out of dyes or build bespoke patterns using pre-made templates from the Marketplace. Finally, mobile platforms such as Android and iOS enable you to create bespoke designs using the Banner Editor app without the need for any other products.
Materials Needed To Make A Banner
Banner creation in Minecraft is a fun method to express your creativity while also enhancing the appearance of your Minecraft environment. In order to make a banner, you will need to acquire a number of crucial components.
To begin, you’ll need an item that may be used as a pattern, such as a flower, feather, or any other object that can be created into an item frame. Second, you will need wool and/or leather. Wool is required for the banner’s hue, while leather is required for precise features such as stripes or checkered patterns. Third, you’ll need dyes in various hues, which will be utilized to make different colored banners with distinct designs. Finally, after all of the items have been acquired, you will need sticks and thread to create the completed banner.
Steps To Make A Banner
Making banners in Minecraft is an excellent way to personalize your environment. They may be made in a number of styles and colors, as well as forms such as stars, squares, rounds, triangles, and others. Here’s how to construct a Minecraft banner:
- Gather the required supplies. 8 pieces of cloth, wool, or leather, and 2 sticks are required.
- Arrange the fabric on a crafts grid in whatever way you choose. To keep your banner design appearing consistent and nice, use the same sort of cloth all the way around.
- Form an X shape with two sticks at the top of your materials in the center row. This will be the banner’s foundation or pole.
- Choose your favorite colored dye and place it in one or two corners of the crafting screen for some more color on your banner design if wanted.
- Once your crafting is done, choose your finished Banner from your inventory list and put it anywhere you like in the world.
Step 1. Open Your Crafting Menu
To begin growing beetroot in Minecraft, enter the crafting menu. To do so, use the 🔑 key on your keyboard or select the 🧰 symbol in your inventory. This will open a 3×3 grid in which you must drag and drop the elements required for beetroot planting.
After you’ve accessed the crafting menu, you’ll need to dig through your inventory for a 🗡️ and some beetroot seeds. You must drag these two things into the 3×3 grid once you have them. The 🗡️ should go in one of the square spaces, and the beetroot seeds should go in the slot exactly next to it. This will put the two things together and produce a new item a “beetroot seed package“.
Finally, all that remains is to exit your crafting menu and bring your freshly crafted object into your Minecraft world.
Step 2. Add The Wool And Stick To The Menu
After you’ve successfully located the required products in your inventory, it’s time to add them to the menu. Select a wool block and then a stick from your inventory to do this. The crafting table will be opened automatically by the game. You should notice a column of what seems to be black-and-white squares on the left side of the crafting table; here is where you will lay your wool and stick.
You can move the wool around with your mouse until it’s in the right place for making a banner in Minecraft. After you’ve put both objects in their appropriate spaces, you may quit the crafting table by clicking anywhere else on the screen.
Step 3. Move The Banner To Your Inventory
Step 3 in the Minecraft banner creation procedure is to add it to your inventory. This enables you to decorate the banner and use it for various reasons. You must use the lead command to bring the flag to your inventory. To do so, enter “/lead” followed by the name of the banner you want to shift. For example, if you made a banner called “MyBanner,” enter “/lead MyBanner” into chat.
When you write this command, a leash or line will appear connecting your cursor to the banner. Select the appropriate spot in your inventory while this leash is enabled and click with your mouse or hit Enter on your keyboard. The banner will automatically shift there. Once finished, use the right-click PC or left-trigger Xbox to destroy or pick up the leash. You may now use your banners to adorn anything you choose.
Minecraft Banner Command
The “Minecraft Banner Command” is a command used in the popular game Minecraft to produce a banner. Banners are necessary for ornamentation and flying flags. This unique Minecraft command enables users to rapidly and simply build bespoke banners without having to fill out lengthy instructions every time.
Users must have the right version of the game loaded on their computer, as well as access to the command line inside the game, to use the Minecraft Banner Command. To use this command, type “/banner” followed by any required color codes and design patterns, then press enter. This will create a Minecraft banner using the information you provide. The banner may then be easily put in-game, enabling you to proudly show it.
Java Edition 1.13 and higher red banner command
The red banner command in Java Edition 1.13 and above enables players to make a red banner out of the provided material and dye. Players will need two dyes of any color, six pieces of wool or banners, and one stick to make the banner. The procedure begins with obtaining or creating components from their inventory. Once they have all of the necessary goods in their inventory, they may use the item crafting grid to make their Minecraft red banner.
This command is handy for players who need to add decorations to their base or construction rapidly. The banners may be used as flags on big constructions, to represent team colors, or just to boost the aesthetic attractiveness of a build while simultaneously offering additional safety from attacking mobs. It’s also great that one of the few commands that needs any kind of craftsmanship allows people to make something that looks so good.
PE – Xbox One – Switch – Win 10 – Education Edition
Adding a bookshelf to your Minecraft world is a simple and creative method to add more storage and aesthetic components. The instructions may differ somewhat depending on the version you’re playing. The methods below describe how to construct a bookshelf in Minecraft PE Pocket Edition for Xbox One, Switch, and Windows 10 Education Edition.
To begin, players must acquire resources for their bookcase. Players will need six pieces of wood planks, one of each variety – oak, spruce, birch, jungle, acacia, or dark oak, three blocks of wool in any color combination, and one book to make a bookshelf. During this phase, players may choose to pick up a few more equipment, such as an axe and a pickaxe.
After gathering their supplies, players may begin creating the frame of the shelf by connecting two horizontal blocks and then adding vertical blocks in all directions until the structure of the shelf is complete. At this phase, it is critical to ensure that all sides are even so that the shelves can be correctly aligned when they are placed later. Then, based on their preferences, players may use their wool bricks to cover either side of the frame before adding additional components such as ladders or doors. Finally, players should add six additional horizontal boards to each side of the shelf before finishing the appearance with a single book in each top corner.
More Decoration Recipes
More Decoration Recipes is the title of a lesson on how to produce a banner in Minecraft, a popular game in which players build virtual worlds out of bricks. This guide walks you through the process of making banners with particular recipes and patterns, such as how to make a banner with the right dye color, wool texture, or pattern. The video also demonstrates how to access other game elements, such as banner placement and rotations.
This section is useful for anybody searching for further ideas or instructions on how to make beautiful things in the game. Aside from banners, more decorations may be made by creatively mixing various colours, textures, and patterns inside Minecraft.
Checkout this video:
More Stories
Minecraft Slope Unblocked: The Complete Guide to Playing Anywhere in 2026
How to Build Epic Minecraft Skyscrapers: Design, Tips, and Techniques for 2026
How To Build An Epic Spruce House In Minecraft: The Complete 2026 Design Guide