
Building a spruce house in Minecraft is more than just stacking wood, it’s about understanding what makes spruce wood visually distinctive and how to leverage its warm, rich aesthetic to create something memorable. Whether you’re setting up a cozy cottage in a taiga biome or constructing an ambitious manor on your survival world, spruce wood offers versatility that appeals to builders of all skill levels. This guide walks you through the entire process, from gathering materials to adding those finishing touches that transform a basic structure into something truly impressive. By the end, you’ll know exactly how to build a spruce house that stands out in your world.
Key Takeaways
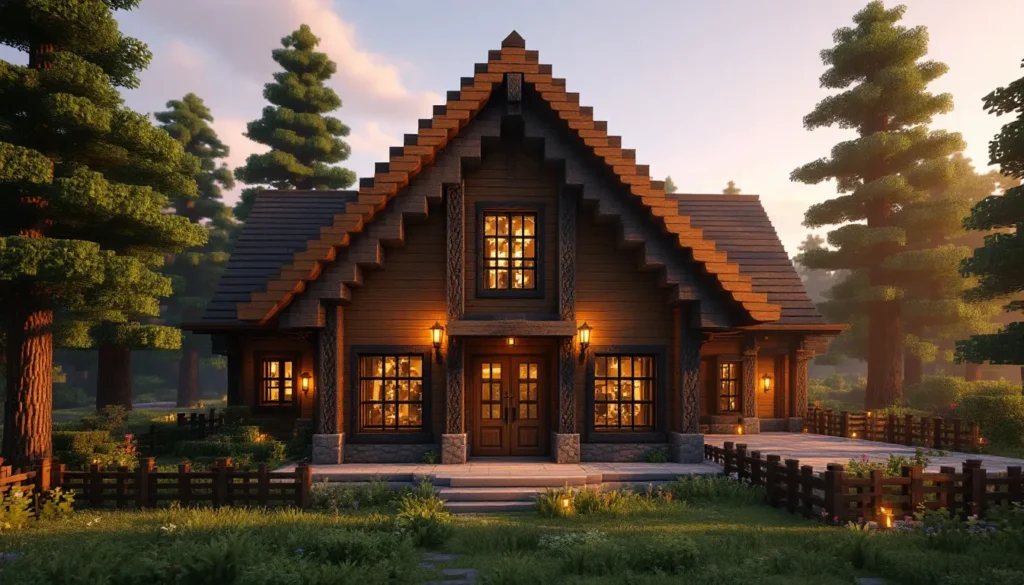
- A spruce house in Minecraft stands out because spruce wood’s dark, muted brown tones create a sophisticated, earthy appearance that pairs naturally with complementary materials like stone, deepslate, and blackstone.
- Establish a sustainable spruce farm in a taiga biome by planting saplings 2 blocks apart with proper lighting, and use bone meal to accelerate growth from 30+ minutes to just minutes per tree.
- Break up flat walls with architectural details like vertical log lines every 4-5 blocks, window frames with trapdoors, and overhangs at the roof transition to transform plain walls into visually compelling structures.
- Gabled roofs are the gold standard for spruce houses, creating dramatic visual interest by angling two roof faces toward a peak using dark slabs or blackstone that contrast beautifully with spruce walls.
- Invest equal effort on interior spaces as exteriors—add lighting with lanterns, use wool carpets to define zones, incorporate decorative blocks, and ensure rooms feel lived-in and intentional rather than empty shells.
- Avoid common mistakes like monotonous wall texture, overusing dark materials (keep them under 30%), random material mixing, poor window placement, and forgetting ground-level definition with a raised foundation base.
Why Spruce Wood Is Perfect For Minecraft Houses
Spruce wood has become a staple for builders because it strikes the perfect balance between aesthetics and practicality. The dark, muted brown tones create a sophisticated, earthy appearance that works in nearly every biome and building style. Unlike lighter woods like oak or birch, spruce conveys solidity and depth, it’s the wood of choice for players who want their builds to feel grounded and intentional.
The color palette of spruce wood works exceptionally well with complementary materials. Stone, deepslate, andesite, and even blackstone pair naturally with spruce planks and logs, giving builders plenty of options for creating contrast and visual interest. This flexibility is crucial because monotone builds, regardless of material quality, often feel flat and uninspiring.
Another reason spruce dominates player builds is its availability. Spruce trees spawn abundantly in taiga, snowy taiga, and old growth taiga biomes. Even if you’re building far from these regions, the relative ease of farming spruce logs makes it one of the most sustainable wood choices for large projects. No need to constantly search for new supplies, you can establish a dedicated spruce farm and harvest materials as needed.
For survival mode, spruce’s advantages extend to utility. The wood type doesn’t require rare materials or complex crafting recipes, it’s straightforward to convert logs into planks and process those into stairs, slabs, and fences. This accessibility makes spruce ideal for players transitioning from creative mode or those building their first major structure.
Gathering Materials: Essential Spruce Resources
Before placing a single block, you need to gather the raw materials that will form your spruce house. The primary material is obvious, spruce logs, but knowing where to find them efficiently and what complementary materials to stock up on separates a smooth building process from a frustrating one.
Finding And Farming Spruce Trees
Spruce trees naturally spawn in taiga biomes, which are easy to locate using a compass or by heading north from your spawn point. In the Overworld, taiga biomes have a cold climate, tall spruce trees, and occasional podzol blocks. Each spruce tree yields 4-8 blocks of logs depending on tree size: old growth taiga variants produce much larger trees with yields exceeding 50 logs per tree.
For efficiency, establish a spruce farm in a taiga biome or transport saplings elsewhere. You can grow spruce saplings in any biome, they don’t require a specific biome type to sprout, only the proper block below (dirt, grass, podzol). Create a farm with rows of saplings spaced at least 2 blocks apart vertically and horizontally to prevent branching interference. Use bone meal to accelerate growth: a single sapling reaches full maturity in minutes rather than the default 30+ minutes.
A basic spruce farm setup requires saplings and space. If you’re early in a survival world, gather at least 10-20 saplings during your first taiga visit. These saplings will form the backbone of your farm. Set aside a 20×20 area with adequate lighting (saplings need light level 8 or higher to grow) and you’ll have a renewable spruce supply indefinitely.
For absolute beginners: chop down visible spruce trees with any wooden axe (stone or better is faster), then collect the logs and saplings that drop. A single stack of 64 logs gives you 256 planks, enough to start your foundation.
Additional Building Materials You’ll Need
Spruce logs and planks are your primary materials, but complementary blocks elevate the design significantly. Spruce stairs, spruce slabs, and spruce fences should be crafted in bulk. Stairs and slabs add dimension to roofs, walls, and interior details. Fences work for railings, decorative details, and perimeter definition.
For contrast and structural definition, gather dark blocks: blackstone, deepslate blocks, or dark oak wood. These create shadow lines that make spruce buildings pop visually. Aim for a 70-30 or 80-20 ratio of spruce to dark materials: spruce should dominate while dark blocks serve as accents.
You’ll also need roofing materials. Dark oak slabs, blackstone slabs, or even deepslate tiles work beautifully with spruce. Many builders prefer dark materials for roofs to contrast with lighter log walls. Gather at least two full stacks of your chosen roofing slabs.
Windows require glass panes, standard glass or tinted glass both work, though tinted glass has become increasingly popular for a modern aesthetic. Craft 30-50 panes to ensure adequate lighting and visual appeal. Trapdoors (spruce or dark oak) add architectural detail around windows and can be used as shutters.
Interior essentials include wool, carpets, and decorative blocks. Gather different colored wool to define rooms and create visual separation. Grab cobblestone or stone bricks for fireplaces and interior walls, these create natural variation and prevent the build from feeling too uniform.
A practical checklist:
- Spruce logs: 3-5 stacks minimum
- Spruce planks, stairs, slabs: Craft from logs as needed
- Dark wood or stone: 1-2 stacks
- Glass panes: 1-2 stacks
- Roofing slabs: 2-3 stacks
- Interior blocks (wool, stone, bricks): 2-3 stacks each
- Decorative items (carpets, beds, doors): Gather as you plan rooms
Foundation And Base Design
A solid foundation isn’t just about preventing mobs from spawning underground, it’s about establishing the visual baseline for your entire structure. Poor foundation work leads to misaligned walls, awkward room layouts, and buildings that feel unstable or cramped.
Planning Your House Layout
Before breaking a single block, spend time planning. On paper or using creative mode, sketch your house footprint. Decide on overall dimensions: a small cottage might be 10×12 blocks, while a manor could span 20×30 or larger. Remember that interior space is what matters, walls occupy blocks too, so a 12×14 exterior footprint creates roughly 10×12 interior space (accounting for wall thickness).
Think about room distribution. A functional house typically includes:
- Entrance/foyer: 2-3 blocks deep
- Living/dining area: 4×5 to 6×6 blocks
- Kitchen: 3×4 blocks
- Bedroom: 5×5 to 6×7 blocks
- Bathroom/storage: 3×4 blocks
Open-concept layouts work for smaller builds (under 15×15), while larger builds benefit from defined, separated rooms. Each distinct room should feel purposeful, no wasted corridor space unless you’re going for a grand, mansion aesthetic.
Plot out where doors will be: main entrance, back door, garage access if applicable. Windows should have strategic placement. Bedrooms benefit from private window placement: living areas need multiple windows for light and visual interest. Outline these during planning to avoid awkward revisions later.
Creating A Solid Foundation
Start by clearing and leveling the building site. Remove all grass, water, and tall grass in your footprint plus 5 blocks in all directions. This gives you working space and prevents water or mobs from interfering. Use a pickaxe to create a flat surface, if building on varied terrain, dig out the high spots and fill in the low areas.
Lay down a foundation base layer using stone, cobblestone, or blackstone. This creates visual definition and prevents dirt from showing at ground level. Make your foundation layer 1 block thick and 1-2 blocks below terrain level. This sunken foundation technique anchors the house visually and makes it feel naturally settled into the landscape.
Add a foundation frame by placing your primary spruce logs or dark stone in the outline of your footprint. This frame serves multiple purposes: it marks the perimeter clearly, prevents placement mistakes during wall construction, and creates a visual boundary. If your house is 16×18 blocks, your foundation frame should form a 16×18 rectangle.
For larger builds, consider adding interior foundation supports. Place a row or grid of stone/blackstone blocks every 5-6 blocks to break up empty space beneath the house. This prevents the interior from feeling hollow and creates natural points where floor support beams can rest visually.
Once your foundation is complete, double-check alignment using the coordinate system (F3 menu on Java, visible coordinates on Bedrock). Symmetrical builds especially benefit from verification, a misaligned foundation becomes exponentially more obvious as walls rise.
Building The Spruce Walls And Frame
Walls are where your spruce house truly takes shape. This is where material choices compound and architectural style emerges. The difference between a plain box and an impressive structure lives in wall construction technique.
Constructing Vertical Walls
Start with corner posts. Place spruce logs vertically at each corner of your foundation frame, rising to full wall height (typically 3-4 blocks for a residential interior ceiling, which means 4-5 blocks exterior to account for the floor and ceiling layers). Corner posts should be solid logs, avoid planks for this structural visual foundation.
Fill in the walls between corner posts. Most builders use spruce planks for wall filling, creating a horizontal emphasis. Alternate planks with vertical log strips every 4-5 blocks, this creates rhythm and prevents walls from appearing flat. For a 16-block-long wall, place vertical log lines at blocks 4, 8, 12, and 16. These vertical lines should use the same log orientation as your corner posts.
For a more detailed aesthetic, create a half-timber effect using dark wood or blackstone. Place dark blocks in a diagonal or cross-hatch pattern within the plank sections. This technique is popular in European-style builds and adds significant visual depth without consuming extra material.
Window placement breaks up wall monotony. Space windows in a pattern, typically one window per 4-5 blocks horizontally, offset from corners. Windows should align vertically: if your living room has a window at height 2, that window should be visible from the exterior at the same height. Use spruce trapdoors as window frames or shutters. Dark oak trapdoors work particularly well with spruce, creating defined shadow lines around glass panes.
Door placement requires similar thoughtfulness. Main entrances look best on walls without competing windows. A door surrounded by 3 blocks of clear wall on each side looks proportional. Secondary doors (back entrance, garage) can be less prominent but should still feel intentional, not squeezed into leftover space.
Adding Architectural Details And Texture
Flat walls are the enemy of impressive builds. Break up large wall sections with texture and detail. Spruce slabs mounted half-way up vertical sections create horizontal lines that guide the eye. Spruce stairs rotated and stair-stepped create depth. These details transform a plain wall into something that catches attention.
Add overhangs at the transition between walls and roof. Extend spruce slabs or stairs out 1-2 blocks beyond the wall line. This creates shadow and depth, making the house appear more substantial. Overhangs also serve practical purposes, they shelter the walls from rain (in theory, since Minecraft rain is decorative) and create defined transitions between different structural elements.
Consider external support columns or buttresses on long wall runs (8+ blocks). A single dark wood column every 6-8 blocks breaks visual monotony and grounds the structure. These columns don’t need to be purely functional, they’re primarily aesthetic, but good design marries form and function.
For exterior variation, use dark oak wood or blackstone to create accent walls on one or two sides. A 2-3 block thick accent stripe running horizontally across a wall draws the eye and adds complexity. This technique is subtle but effective: it prevents the exterior from feeling overly uniform while maintaining cohesion.
Entryways deserve special attention. Create a porch by extending your roof overhang forward 2-3 blocks and adding steps or slabs to elevate the entrance. Frame the door with dark wood or blackstone pillars on each side. This creates a focal point that makes the entrance feel intentional and important rather than a simple hole in the wall.
Roofing Techniques For Spruce Houses
The roof is your house’s crown. A well-executed roof elevates an average build into something memorable. Poor roofing, flat, monotone, awkwardly pitched, sabotages even excellent wall work.
Roof Styles That Complement Spruce Wood
Gabled roofs are the gold standard for spruce houses. Two angled roof faces meeting at a peak create dramatic visual interest and fit naturally with spruce’s warm, traditional aesthetic. Gabled roofs work for any house size and are forgiving for builders new to roofing. The peak creates a focal point: position it along the longest wall (front-to-back) for maximum impact.
Hipped roofs offer sophistication if you have the patience for angled geometry. All four sides of the roof slope inward toward a ridge line. Hipped roofs look more professional than gables but require careful sllab placement and planning. For a beginner, attempt a hipped roof only on square or nearly-square footprints (12×12 or similar).
Shed roofs (single slope) work for modern aesthetic spruce builds or as additions. They’re the simplest to construct, one-way slope from high point to low point. Shed roofs look best when paired with geometric, intentional design rather than traditional cottages.
Flat roofs are rarely recommended for traditional spruce builds but work for industrial or modern styles. If using a flat roof, create visual interest with raised edges (using slabs or stairs) and rooftop details like chimneys or ventilation shafts.
Choose your roof style based on overall house theme. A cozy taiga cottage screams gable roof: a contemporary minimalist build suits a shed roof. Spruce’s versatility means any style can work, just commit to the aesthetic.
Installing Roof Blocks And Slopes
For a gabled roof, establish your peak line first. If your house is 16 blocks wide and 20 blocks long, your peak should run lengthwise down the middle (or offset for asymmetrical designs). Mark your peak with a row of blackstone or dark oak slabs at the height where your peak will sit, typically 2-3 blocks above your roof base.
Slope your roof using stairs in your chosen material. Dark wood slabs or blackstone slabs create the best visual contrast with spruce walls. Starting at your roof perimeter (where walls end), place slabs in stair formation ascending toward the peak. Use the staircase block orientation feature to rotate stairs appropriately, they should point upward as they progress toward the peak.
Most roofs use a 45-degree angle (one block up per block forward), which requires alternating full blocks and slabs. For steeper roofs (60-degree), use solid blocks with less slab variation. For shallower roofs (30-degree), use more slabs and fewer full blocks.
At your peak, use a ridge line of full blocks or prominent slabs. This ridge should use a different material than your slope, if slopes are dark oak, make the ridge blackstone or vice versa. The ridge creates definition and draws the eye to your roof’s highest point.
Overhang your roof by 2-3 blocks beyond walls on all sides. This creates shade, protects walls, and adds visual depth. Extend your roof-edge slabs outward and downward, creating a soffit. This soffit can be plain dark wood slabs or decorated with dark oak trapdoors for added texture.
Chimney placement adds character. Position a 2×2 chimney block structure off to one side of your roof (typically near where a fireplace would be internally). Use dark blocks for the chimney, blackstone bricks or spruce logs rotated vertically work well. Chimneys should rise 3-5 blocks above the roof and include a 1-block overhang at the top. Players won’t see functional implications, but the visual statement is powerful.
For survival mode consideration, remember that roofs must support themselves geometrically, Minecraft blocks don’t depend on invisible internal support. Your slabs and stairs, properly placed, must form a coherent slope without floating blocks. Test your roof structure by removing temporary supports: if pieces fall, your geometry was flawed.
Many builders create interior roof support beams for aesthetic reasons. Spruce logs or dark wood can run parallel to your peak line, visible from interior rooms with vaulted ceilings. These beams serve no mechanical purpose but reinforce the visual impression of a well-constructed structure.
Interior Design And Room Organization
Interior design separates impressive shells from truly memorable builds. Countless beautiful exteriors contain featureless, disappointing interiors. Invest time making interior spaces feel lived-in and intentional.
Creating Functional Living Spaces
Start with your entry foyer. This is your player’s first interior impression, make it welcoming. Use dark oak doors or spruce doors for a defined entrance. Create a small landing 2-3 blocks deep before opening into main living areas. Add spruce stairs ascending to an upper floor if your build is multi-level. A spruce trapdoor positioned above the entrance can create a recessed ceiling detail, adding depth.
Your living/dining area should be open and spacious, resist compartmentalizing unless intentional. Use wool carpets in complementary colors to define zones. Dining areas with tables and chairs on dark wool create visual separation from living spaces with seating. Height variation helps too: use dark oak slabs to create step-up platforms delineating different functional zones.
For the bedroom, prioritize intimacy. Beds should be the focal point, place them against a feature wall using dark wood or accent colors. Window placement is critical: bedrooms benefit from windows that frame exterior views. Create a sleeping nook by raising the bed platform 1-2 blocks and surrounding it with spruce slabs or dark oak wood to frame the sleeping space.
Kitchens and dining benefit from counter depth, use double-height setups with dark oak slabs as work surfaces and furnaces or smokers as functional elements. Line counters with cauldrons (decorative) and place barrels as storage containers. The visual impression matters more than actual inventory management in Minecraft architecture.
Bathrooms might seem simplistic, but they’re opportunities for detail. Use dark oak trapdoors over cauldrons as bathtubs. Walls can feature mossy cobblestone or dark oak wood for moisture-resistant appearance. Place chains hanging from ceiling as towel racks. These details transform basic utility into recognizable functional space.
Staircase design deserves attention. Rather than straight runs, create landings every 8-10 steps. Use dark oak wood or spruce wood alternately to create visual rhythm. Add railings using dark oak fences with spruce logs as posts. Railings prevent accidental falls and frame stairs architecturally.
Decorating With Complementary Materials
Interiors should repeat your exterior color palette while introducing warmth. Spruce wood, dark oak, blackstone, and stone bricks should form your primary materials. Add secondary materials sparingly: warped wood or crimson wood (one accent wall maximum) prevents over-complication.
Wool colors should be intentional. Use the same wool colors throughout rooms to create visual continuity, if your living room has blue carpet, your bedroom might use dark blue with blue rugs. This repetition makes the interior feel cohesive rather than chaotic.
Lighting design is crucial. Use lanterns hanging from ceilings or mounted on walls. Soul lanterns create cooler tones ideal for hallways or utility spaces, while regular lanterns provide warm ambient light. Place candles on tables and amethyst blocks behind wall sections for accent lighting. Avoid relying solely on glowstone, varied light sources feel more natural.
Decorative block choices define atmosphere. Shelving using dark oak slabs mounted on walls displays decorative items (potted plants, books, decorative blocks). Paintings break up large wall sections. Item frames displaying enchanted tools or decorative items add character. Bookshelves in study areas feel purposeful and add texture through variation.
Plant life matters. Potted plants scattered throughout interior spaces add life and prevent sterility. Lantern-lit gardens in sunlit rooms create natural focal points. Vines hung from high ceilings soften hard block edges. These organic elements contrast beautifully with geometric architecture.
Consider player-focused details: crafting tables and furnaces in kitchen or utility areas, armor stands displaying equipment, item frames showing functional items. These suggest the space is actively inhabited rather than museum-like.
Balance is critical. An overly sparse interior feels empty: an overly decorated interior feels cluttered. A good rule: 60% structural blocks, 30% functional/decorative items, 10% decorative accents. This ratio prevents overwhelming visual noise while maintaining interest.
Advanced Design Tips For Realistic Spruce Homes
Once you’ve mastered basics, advanced techniques separate good builds from great ones. These approaches require planning but deliver results proportional to effort invested.
Blending Multiple Wood Types Effectively
Spruce alone, even though its visual appeal, can feel monotonous across large structures. Strategic inclusion of complementary wood types elevates complexity and sophistication. The key is intentional restraint, mixing too many wood types creates visual chaos rather than interest. According to guides on game design, attention to material balance is critical for professional-looking structures.
Dark oak is your primary complement to spruce. Use it for roofs, trim work, and accent elements. Dark oak should never exceed 25% of visible exterior material, it’s punctuation, not content. Frame windows and doors with dark oak, create roofing elements, and use it for support beams. The contrast strengthens both wood types visually.
Crimson and warped wood offer modern aesthetic options but should be used sparingly, an accent wall maximum. These materials feel too vibrant for traditional spruce builds: reserve them for contemporary designs or accent features inside.
Blend wood types through strategic placement patterns. Rather than random mixing, create intentional designs: horizontal dark oak stripes every 5 blocks, vertical dark oak pillar supports, or layered framework using alternating wood. Humans recognize and appreciate intentional patterns: we rebel against randomness.
Roof materials deserve special consideration. Most spruce house roofs benefit from blackstone, dark oak, or even deepslate materials rather than spruce itself. This contrast between warm wall materials and cooler roof tones creates visual separation and sophistication. Architects understand that roofs should distinct from walls: Minecraft builders should apply the same principle.
Trapdoors are underutilized tools for multi-material integration. Dark oak or spruce trapdoors used as window shutters, siding accents, or roofing details create variation without requiring complete structural rework. Trapdoors offer unique visual texture impossible to achieve with full blocks.
Using Lighting And Landscaping To Enhance Appeal
Lighting transforms your build from day-time spectacle to 24-hour attraction. Poor lighting relegates spruce houses to invisibility after sundown: excellent lighting makes them focal points regardless of time.
Exterior lighting should highlight architectural features. Place lanterns along the roofline peak to emphasize the roof’s shape. Mount lanterns beside door and window frames to draw attention to these focal points. Create pathway lighting using lanterns spaced regularly from the main structure to surrounding landscape. Spacing affects feel: tight spacing (2-3 blocks) feels formal: loose spacing (5-6 blocks) feels organic.
Use warm-toned lighting (regular lanterns, campfires, candles) for entryways and gathering spaces. Reserve cool-toned lighting (soul lanterns, soul campfires) for utility areas and atmospheric accents. This color temperature variation mimics real-world design principles.
Amethyst blocks offer unique aesthetic value. Place them behind glass or translucent materials to create accent lighting. A window with amethyst blocks behind it glows subtly and creates dramatic visual impact. Use sparingly, a few strategically placed amethyst blocks enchant: excessive amethyst becomes gaudy.
Landscaping contextualizes your build within the world. A spruce house floating in bare terrain loses 50% of its appeal. Surround your house with intentional landscape design. In taiga biomes, preserve existing spruce trees but prune branches to frame your house. Add dark oak saplings in organized rows for future maturation. Use dark grass, podzol, and coarse dirt to create varied terrain around your foundation.
Create a garden space near your entrance using intentional plantings. Flowers (particularly dark-colored varieties like dark primal flowers or crimson roots), ferns, and grass create organic contrast to architectural structure. Space plantings irregularly, nature doesn’t arrange things in grids.
Water features enhance appeal dramatically. A small pond or stream near your house suggests natural landscape integration. Use dark stone or blackstone as borders to create defined water features that feel intentional rather than accidental.
Fencing defines property boundaries and guides player movement. Spruce fences feel appropriate, but dark oak fences with spruce fence posts create visual interest. Space fence posts with variety: don’t place them at regular intervals. Natural-looking fencing has irregular spacing and gate locations.
Consider sightlines. Approach your house from different directions and note what catches the eye first. Ensure important features (peaked roof, framed entryway, distinctive windows) are visible from major angles. Deliberately hide utility features (storage areas, industrial elements) from primary sightlines. This directional design principle matters enormously for overall impact.
For builders using mods, community resources like Nexus Mods offer decoration and landscaping enhancements. Shader packs in particular transform lighting and make custom builds genuinely extraordinary.
Common Mistakes To Avoid When Building Spruce Houses
Learning from others’ mistakes accelerates your improvement. These pitfalls snare even experienced builders if they’re not consciously avoided.
Mistake #1: Monotonous Wall Texture
Plain spruce plank walls, unbroken by variation, appear flat and lifeless. New builders often think adding more blocks equals improvement, wrong. Instead, break walls with architectural details: vertical dark oak columns, horizontal slab lines, window frames, trapdoor shutters. Variation costs minimal extra material but pays dividends in visual appeal.
Mistake #2: Flat Roofs or Poor Roof Geometry
A flat roof removes most of a build’s character. Even gentle slopes dramatically improve proportions. If you’re unsure about slope steepness, go slightly shallow (30-degree) rather than exaggerated. Shallow slopes feel purposeful: clumsy steep slopes look accidental. Ensure your roof peak is clearly defined and visible from ground level.
Mistake #3: Ignoring Interior Details
Many builders invest 80% of effort on exteriors, leaving interiors barren. Empty rooms with nothing but beds feel hollow. Invest equal effort on interior furnishings, lighting, and detail work. A spruce house is half exterior, half interior, neglecting one sabotages the entire structure.
Mistake #4: Overusing Dark Materials
Dark wood and blackstone are tools, not solutions. Excessive dark materials (more than 30% of exterior) make houses appear gloomy and somber. Spruce’s warm tones should dominate: dark materials should accent and frame. If your house looks dark and oppressive, you’ve overused dark blocks.
Mistake #5: Random Material Mixing
Throwing together multiple wood types without intention creates visual chaos. Every material choice should serve a purpose. Crimsons shouldn’t appear unless intentional thematic design warrants it. Dark oak should frame and accentuate, not compete. Coherent palettes outperform random variety.
Mistake #6: Poor Window Placement
Windows clustered randomly or unevenly spaced create amateur impression. Plan window placement symmetrically or in clear patterns. Offset windows in adjacent walls, if the front has windows at blocks 4 and 12, side walls should have windows at different heights. This offset pattern looks intentional and sophisticated.
Mistake #7: Forgetting Ground-Level Definition
Houses that sit directly on terrain blend into landscape rather than standing apart. Create defined foundation bases using dark stone materials sunken 1-2 blocks below terrain. This visual separation immediately improves presence. A raised porch with steps further enhances this effect.
Mistake #8: Absent or Inconsistent Lighting
Unlit buildings disappear after sunset. Interior lighting should be obvious from exterior windows, glowing windows suggest inhabited space. Exterior lighting should highlight key architectural features. Inconsistent lighting (bright on one side, dark on another) feels accidental. Plan lighting comprehensively during construction.
Mistake #9: Ignoring Roof Overhangs
Roofs that end exactly where walls end look abrupt. Overhanging roofs 2-3 blocks beyond walls create shadows, depth, and sophistication. Overhangs also shelter walls from weather (decoratively). This single detail, easily added late in construction, elevates appearance disproportionately.
Mistake #10: Over-Complication of Interior Spaces
Not every room needs maximized detail. Some spaces benefit from simplicity and openness. Bedrooms work best with focused detail (featured wall, custom bed frame): living spaces might use varied zones without every inch decorated. Restraint and intentionality outperform constant adornment.
Consider taking screenshots of your build-in-progress to review objectively. What jumps out as needing attention? Where does your eye get lost? These observations guide improvement priorities better than assumptions while actively building.
Conclusion
Building a spruce house requires understanding fundamentals, material selection, structural planning, architectural styling, and detail work, then executing them with intentionality. Spruce wood’s warm aesthetic provides an ideal foundation for builds that feel both accessible and sophisticated. From initial material gathering through advanced landscaping, each phase compounds toward a cohesive, impressive structure.
The best spruce houses balance simplicity with detail. Beginners often overcomplicate designs: experienced builders know that restraint and intentional choices outperform visual excess. Start with fundamental structure, solid foundation, clear walls, properly proportioned roof. Add complementary materials thoughtfully. Develop interior spaces that feel inhabited and purposeful. Only then layer decorative details that transform competence into excellence.
Your first spruce house might not be perfect, and that’s completely fine. Building in Minecraft is iterative. Each structure teaches lessons applicable to the next. Mechanics like roof geometry, material proportion, and lighting become intuitive through experience. What matters is committing to intentional design and being willing to revise unsatisfactory elements.
The taiga biomes await with abundant spruce. Whether you’re constructing your first cottage or tenth mansion, these principles scale regardless of ambition. Focus on material balance, architectural variety, thoughtful lighting, and functional interior spaces. Build with purpose, and your spruce houses will stand out in any world. Happy building.
More Stories
Minecraft Slope Unblocked: The Complete Guide to Playing Anywhere in 2026
How to Build Epic Minecraft Skyscrapers: Design, Tips, and Techniques for 2026
How To Build An Epic Spruce House In Minecraft: The Complete 2026 Design Guide