
If you’re looking for an easy way to make a map in Minecraft, look no further! This guide will show you how to make a map in Minecraft with a location marker easily.
Make A Minecraft Map Video Tutorial
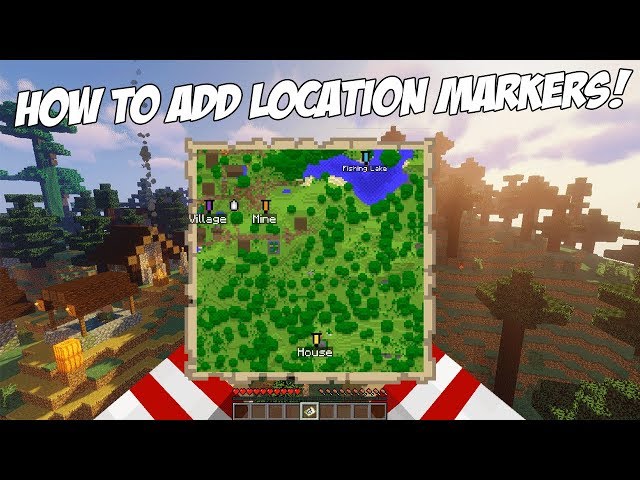
Making a Minecraft Map is a terrific way to design your own world and see what incredible things await you. In this video, you will learn how to create a map in Minecraft using location markers. The map may be used as a guide when exploring or hung on the wall as a poster. By adding location markers to your map, you may highlight essential areas that you want to remember and quickly find later.
The first stage in creating your Minecraft Map is deciding where you want to explore and construct. Then, from the game’s main menu, go to the “World” option to view your map. Once you’ve accessed the World menu, click on “Create New World” and then choose “Create from Existing Seed” before entering any seed code, such as 12345. This creates landscape for your map, including mountains, lakes, rivers, and other features.
After your new world has been built and loaded, click on “Choices” and then pick “Map Settings” from the list of available options. You may define specific settings for what sort of blocks are shown while viewing your Minecraft maps, such as sandstone, glass, and so on, as well as where location markers appear on it. Finally, press the “Save” button to guarantee that all adjustments are preserved.
Now that you’ve constructed and personalized your Minecraft map with the desired settings & location marker, it’s time to experiment with various blocks, terrains, creatures, and stuff to build some unique masterpieces. Remember that maps aren’t only for exploration and resource collection; they’re also a terrific tool to monitor your progress inside the game.
Available Platforms
Because Minecraft is accessible on a variety of systems, the methods for creating a map in the game may change significantly depending on the platform you are using. You must ensure that your device has sufficient memory and power to execute the game effectively; certain mobile devices may not have sufficient capability for this job.
After you’ve decided on a platform, you may begin creating a map in Minecraft. Before you begin, give your map a distinct name so that you can quickly refer to it afterwards. Once you’ve completed your map, you’ll be able to add markers that are visible from the air or ground level—these markers will help you remember where significant sites in your world are. To make these markers stand out even more, you may modify them with various colors and icons.
Tools & Items Needed
A few tools and things are required while creating a map in Minecraft with a location marker:
- A crafting table and wooden planks are required to create the map.
- You’ll also need shears to harvest the leather, lily pads, and green dye for the location marker, as well as paper to put the items together on a crafting table to make the map.
- You’ll also need extra leathers and lily pads if you want to construct more than one map.
- You should also get an item frame to hang your finished map on to ensure that all of your objects are in one spot.
It will be simpler to create the ideal personalized map if you have these tools and goods ready to go for your construction job.
Steps To Make A Map
Making a map in Minecraft is a straightforward process that can be completed in a few stages.
- The first step is to make a map. You will need 8 pieces of paper and 1 compass to build your map, which may be put together to form the item Map. This takes up one of your inventory slots.
- Take out your map from your inventory and set it on the ground. Now, as you go about the game, little sections of a larger image will be shown to you; these are known as Explored Areas.
- The bigger image should display after the Explored Areas have been finished. It’s worth noting that if you don’t have any explored places, your map will be blank and won’t display any changes until you do.
- The last step is to place a location marker on the Minecraft Map to assist identify crucial areas such as players’ houses or spawn points. Simply right-click on the ground with an empty hand while holding down shift, and an X-shaped marking will appear on your map each time it is opened again.
1. Open Your Crafting Menu
The first step in constructing a map in Minecraft is to open your Crafting Menu. This may be accomplished by pressing the Escape key or the Menu key “push the button on your controller”. When the menu appears, pick Crafting Table “, which is located in the upper left-hand corner of your screen. By selecting this, you will be sent to a 3×3 crafting grid where you may create a variety of products, including maps.
To build a map, fill the crafting grid with 8 pieces of paper and 1 compass. To make a rudimentary map that you may use to explore your planet, lay the paper on all of the boxes and the compass in the centre box.
You can also add Location Markers, which are colorful markers that assist gamers quickly and easily discover specified spots. Simply drop one piece of paper and four bits of dye in any color into your crafting grid to add one.

2. Add Papers and Compass
Once you’ve gathered the necessary materials to produce pickaxes, you’ll want to put in some extras to create a map in Minecraft with a location marker. Crafting the pickaxe requires the addition of papers and a compass. You will need:
- Three pieces of sugar cane and one piece of paper to make the papers.
- Four iron ingots and one redstone dust to make the compass.
The compass must be coupled with paper after it has been produced in order to generate the map. Make sure to include all of these things before trying to make the pickaxe so that everything is ready when it comes time to make it.
3. Move The Map To Your Inventory
After you’ve finished crafting the map, add it to your inventory. All you have to do is right-click on the map block with your hand. This will save the map to your hotbar and make it available for usage.
You may now drag the marker onto the map with another click to designate a particular location on your map. This is handy for highlighting locations of importance like towns and resources. You may also zoom in or out from the highlighted location by pressing F3+N or F3+M.
After completing these steps, you will have successfully generated a map in Minecraft with a location marker.
Minecraft Map Command
The Minecraft Map command is a powerful tool that enables users to create unique maps of their favorite Minecraft worlds fast and effortlessly. This command may be used to create overviews of explored terrain as well as mark particular spots of interest. Players may use this command to precisely describe the structure of their in-game settings, even if they have several levels and sub-locations.
The Minecraft Map Command may also be used to designate particular areas, such as chests or chests carrying valuable things. When using the map command, players must remember to add an appropriate marker so that they can quickly make their way back to those spots. The instructions used may vary depending on the game version and whether or not modifications are enabled, but normally entail entering “/map” into the chat window followed by some basic information about the target location.
Java Edition 1.13 and higher
Minecraft Java Edition 1.13 and later have an in-game map editor, comparable to the Visualized Worldmap software seen in Bedrock Edition. The new approach is called “Location Marks,” and it allows you to simply set markers on the game environment to help you remember where buildings, resources, and other places of interest are situated.
There are two kinds of markers on the market: Waypointmarkers, which may be set anywhere in the game world, and Playermarkers, which show the player’s current location on the map. Location markers are colored differently depending on their function, with orange indicating key landmarks and green indicating mineshafts for easy reference.
PE – Xbox One – Switch – Win 10 – Education Edition
Maps with location markers may be readily created by Minecraft players using the Pocket Edition PE, Xbox One, Nintendo Switch, Windows 10, or Education Edition. Maps are useful for locating yourself in the game environment and charting your progress through different adventures.
To build a map, collect 8 pieces of paper and a compass. In the crafting menu, place the papers to make a map in the output slot. This procedure is the same for all Minecraft platforms and versions. You may then begin exploring, and the game will monitor your progress while filling up the map as you go about.
If you need additional location markers, just make another compass and more paper maps. Place it on a wall or on furniture to help you recall crucial locations as you move through the game.
More Basic Recipes
Making a Minecraft map is a terrific way to keep track of your progress and explore your environment. It’s especially useful if you want to develop a huge base or city. Making a map may seem daunting at first, but it is really fairly simple; all you need is one blank sheet of paper and eight gold nuggets to get started. You may also put marks to particular locations, such as spawn spots or the end portal.
To build a map, first open your crafting table and set the 8 gold nuggets in the center row of the grid. Then, just lay the blank paper wherever in the grid, and you’ve got yourself an empty map. A compass will be required to mark places on the map. Simply combine your empty map with a compass, then right-click on any block in-game that you wish to include in your mapping project. This strategy allows you to keep track of where everyone is at all times and guarantee that everyone remains safe while exploring together.
Checkout this video:
More Stories
Minecraft Slope Unblocked: The Complete Guide to Playing Anywhere in 2026
How to Build Epic Minecraft Skyscrapers: Design, Tips, and Techniques for 2026
How To Build An Epic Spruce House In Minecraft: The Complete 2026 Design Guide